
Before: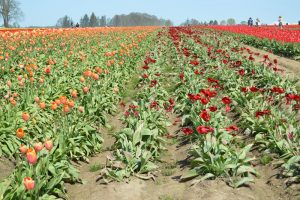
After:
By the time we arrived at the tulip fields, the sun was full blast and there was a strong wind stirring up quite a dust cloud during the whole afternoon. The dust actually emphasized atmospheric perspective and was kind of interesting in some other photographs, but for this one we wanted a stronger blue as a complement to the orange zones of color. This is the first time we have tried the blue sky tool in Photoshop – one “click” and instant postcard type sky! The overlay of blue also darkened the far distant trees as well. Don’t worry, we won’t overuse this feature, we tend to like the whole range of colors that our skies can be! Even though this is the first noticeable change in the before and after views, we recommend that all other photo. altering takes place first and the blue sky added last. It will save dozens of “UNDO” clicks!
Still experimenting with the “Spot Healing Tool” and learning about the “Eraser tool” – that’s how the oak tree’s branches were removed from the left-hand border portion of the sky. We had pretty good results with removing several of the images of people, some of whom ended up cropped out anyway (oh well, it was good practice!) Some funny results happened in removing the people standing in the red tulip rows, the lower portions of them were completely replaced with red tulips with the first swash of the “Spot Healing Tool”, but removing the parts with the sky in the background was a huge effort, and still left a blurry distortion. So, the lesson here is: when learning to Photoshop . . . tiptoe through the tulips!
Speaking of tulips, we didn’t alter the colors or strong contrast since we were happy with the results.